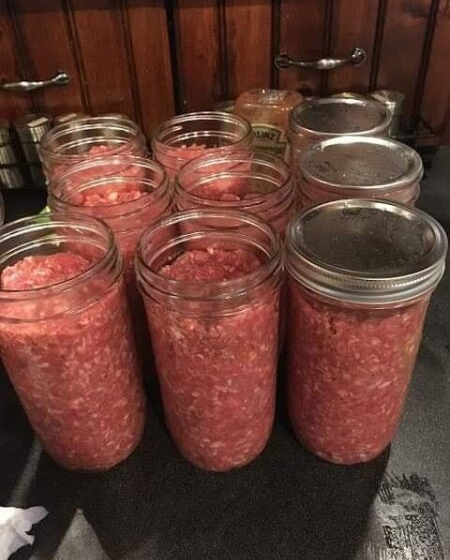
Home-canned ground beef is a convenient pantry staple for quick meals such as tacos, soups, casseroles, pasta sauces, and skillet dinners. The meat is cooked first, packed into jars with hot broth or water, and then processed in a pressure canner.
Because meat is a low-acid food, it must be processed in a proper pressure canner. A boiling-water bath, oven, dishwasher, or small pressure cooker cannot safely preserve ground beef for shelf storage. Correct pressure and processing time are essential to prevent botulism.
Recipe Information
Preparation time: About 30 minutes
Pressure-canning time:
- 75 minutes for pint jars
- 90 minutes for quart jars
Yield: Varies depending on the amount of meat used
Equipment Needed
- Pressure canner large enough to hold at least four quart jars upright
- Pint or quart Mason jars
- New canning lids
- Screw bands
- Jar lifter
- Wide-mouth funnel
- Bubble-removal tool or nonmetallic spatula
- Clean towels
- Large skillet
- Saucepan for broth or water
A small pressure cooker is not considered a substitute for a pressure canner in USDA home-canning instructions.
Ingredients
- Fresh ground beef
- Boiling beef broth, tomato juice, or water
- Canning salt, optional
Use approximately:
- 1 teaspoon salt per pint jar, optional
- 2 teaspoons salt per quart jar, optional
Salt is added for flavor, not safety.
Before You Begin
Use fresh, properly chilled ground beef. Wash your hands, clean the work surface, and inspect all jars for cracks or chips.
Wash the jars, lids, and bands in hot soapy water and rinse well. Keep the jars warm until they are ready to be filled.
Check that the pressure canner is clean and working properly. Make sure the vent pipe is clear. A dial gauge should be checked for accuracy at least once each year.
Instructions
1. Brown the ground beef
Place the ground beef in a large skillet over medium heat.
Cook it until lightly browned, breaking it into small pieces as it cooks. The meat does not need to be cooked until dry or deeply browned, but it should no longer be raw.
Ground meat may also be shaped into patties or meatballs before browning.
2. Drain the excess fat
Transfer the browned beef to a colander and drain away as much excess fat as possible.
Removing the excess fat improves the quality of the finished product and helps keep grease away from the jar rims.
Do not rinse the meat.
3. Heat the packing liquid
Bring beef broth, tomato juice, or water to a full boil in a separate saucepan.
The official hot-pack method requires liquid to be added to the jars. Do not dry-pack the ground beef for shelf storage.
4. Fill the jars
Place a warm jar on a towel.
Add the optional canning salt:
- 1 teaspoon to each pint jar
- 2 teaspoons to each quart jar
Loosely spoon the hot browned beef into the jar.
Do not press or pack the meat down tightly.
5. Add the boiling liquid
Pour boiling broth, tomato juice, or water over the meat.
Leave 1 inch of headspace between the food and the top of the jar.
6. Remove trapped air
Slide a plastic bubble-removal tool or nonmetallic spatula down the inside of the jar.
Move it gently around the jar to release trapped air.
Check the headspace again and add more hot liquid if necessary, maintaining the full 1-inch space.
7. Clean and close the jars
Wipe each jar rim carefully with a clean, damp cloth.
Grease on the rim can prevent the lid from sealing properly.
Center a new lid on the jar and screw on the band until fingertip-tight. Do not overtighten.
8. Load the pressure canner
Place the rack inside the canner and add the amount of water specified by the manufacturer. When no specific amount is given, current pressure-canning guidance generally calls for about 2 to 3 inches of water. For a hot-packed product, the canner water may be preheated to approximately 180°F or 82°C.
Place the filled jars upright on the rack using a jar lifter.
Lock the canner lid in place, leaving the vent open or the weight off.
9. Vent the canner
Heat the canner on high until a strong, continuous funnel of steam escapes through the open vent.
Once the steam flows continuously, vent the canner for a full 10 minutes.
After 10 minutes, close the vent or apply the weighted gauge. Skipping this step can leave trapped air inside the canner and cause underprocessing.
10. Bring the canner to pressure
Allow the canner to reach the pressure required for your altitude and gauge type.
Begin counting the processing time only after the correct pressure has been reached.
Processing Times
Dial-Gauge Pressure Canner
| Elevation | Pint jars | Quart jars | Required pressure |
|---|---|---|---|
| 0–2,000 feet | 75 minutes | 90 minutes | 11 PSI |
| 2,001–4,000 feet | 75 minutes | 90 minutes | 12 PSI |
| 4,001–6,000 feet | 75 minutes | 90 minutes | 13 PSI |
| 6,001–8,000 feet | 75 minutes | 90 minutes | 14 PSI |
Weighted-Gauge Pressure Canner
| Elevation | Pint jars | Quart jars | Required pressure |
|---|---|---|---|
| 0–1,000 feet | 75 minutes | 90 minutes | 10 PSI |
| Above 1,000 feet | 75 minutes | 90 minutes | 15 PSI |
These times and pressures come from the National Center for Home Food Preservation’s tested process for ground or chopped meat.
11. Maintain steady pressure
Adjust the heat to keep the canner at or slightly above the required pressure for the entire processing time.
If the pressure falls below the required level at any point, bring the canner back to the correct pressure and restart the full processing time from the beginning.
12. Cool the canner naturally
When the full processing time is complete, turn off the heat.
Do not force-cool the canner, pour water over it, or remove the weight early.
Let the pressure return to zero naturally. After the canner is fully depressurized, wait another 10 minutes before carefully opening the lid.
Lift the lid away from your face to avoid steam burns.
13. Cool the jars
Remove the jars with a jar lifter, keeping them upright.
Place them on a towel or cooling rack with at least 1 inch of space between them.
Do not tighten the bands, press the lids, or move the jars unnecessarily.
Let them cool undisturbed for 12–24 hours.
14. Check the seals
After the jars are completely cool, remove the screw bands.
Press the center of each lid. A properly sealed lid should be firm and should not flex up and down.
Any jar that did not seal should be refrigerated and used promptly, or reprocessed within 24 hours using a new lid and the complete processing time.
Labeling and Storage
Wipe the jars clean and label them with the contents and date.
Store sealed jars in a cool, dark, dry place.
For the best flavor and quality, use them within one year.
Do not store jars with the screw bands tightened in place. Removing the bands makes it easier to notice a failed seal.
How to Use Canned Ground Beef
Drain the meat if necessary, then use it in:
- Tacos and burritos
- Spaghetti sauce
- Chili
- Sloppy joes
- Shepherd’s pie
- Beef soup
- Casseroles
- Stuffed peppers
- Skillet meals
- Gravy over mashed potatoes
The liquid can also be used in soups, sauces, and gravies.
Important Safety Notes
Never taste home-canned meat to decide whether it is safe.
Discard a jar without tasting if:
- The lid is loose or bulging
- The jar leaked
- Liquid spurts out when opened
- The food smells unusual
- Mold is present
- The seal has failed
- You are uncertain whether the correct time or pressure was maintained
Do not try to rescue meat that was significantly underprocessed. Food that may contain botulinum toxin should be discarded safely.
Frequently Asked Questions
Can I process ground beef in a boiling-water bath?
No. Meat is a low-acid food and must be processed in a pressure canner. Boiling-water temperatures are not high enough to safely destroy botulism spores in low-acid foods.
Can I pack raw ground beef directly into jars?
The tested method for ground or chopped meat is a hot pack: brown the meat first, remove excess fat, then add boiling broth, tomato juice, or water.
Can I add onions, garlic, peppers, or sauce?
For safe shelf-stable canning, do not freely change a tested recipe by adding low-acid ingredients or thick sauces. Can plain ground beef using the tested method, then add seasonings and other ingredients when preparing the meal.
Can I use a small electric pressure cooker?
Not for this tested process. USDA pressure-canning guidance is based on pressure canners large enough to hold at least four upright quart jars.
Why must I leave 1 inch of headspace?
Correct headspace allows the food to expand during processing and helps the jar form a strong vacuum seal afterward.
Why is there liquid in the jars?
The tested process calls for boiling broth, tomato juice, or water. The liquid helps transfer heat evenly throughout the jar during processing.
Final Notes
Pressure-canned ground beef can be a convenient and practical pantry ingredient, but it must be prepared using tested instructions. Brown the meat, remove excess fat, pack it with boiling liquid, maintain 1 inch of headspace, and process it for the full time at the pressure required for your altitude.
Never use a water bath or improvise the processing time. Safe home canning depends on following the tested method exactly.