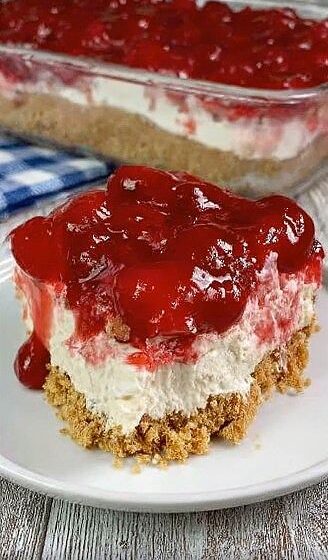
If you love classic cheesecake but don’t want to turn on the oven, Easy No-Bake Cherry Cheesecake is the perfect solution. This dessert is creamy, smooth, and rich, with a buttery biscuit crust and a glossy cherry topping that adds just the right balance of sweetness and tang. It’s an ideal recipe for warm days, busy schedules, or anytime you need a reliable make-ahead dessert that looks impressive but requires minimal effort.
No-bake cheesecakes are especially popular because they’re forgiving and beginner-friendly. There’s no worrying about cracks, water baths, or overbaking. Instead, this version sets in the refrigerator, allowing the flavors to meld beautifully. The result is a light yet indulgent cheesecake that slices cleanly and tastes even better the next day.
Ingredients (Serves 8–10)
For the Crust
- 250 g (2 cups) graham cracker or digestive biscuit crumbs
- 120 g (½ cup) unsalted butter, melted
For the Cheesecake Filling
- 450 g (16 oz) cream cheese, softened
- 120 g (1 cup) powdered sugar, sifted
- 1 teaspoon vanilla extract
- 240 ml (1 cup) heavy whipping cream, very cold
- 1 tablespoon lemon juice
For the Topping
- 1 can (400 g / 14 oz) cherry pie filling
Detailed Instructions
1. Prepare the Crust
In a medium bowl, combine the biscuit crumbs and melted butter. Mix until all the crumbs are evenly moistened and resemble wet sand.
Press the mixture firmly into the bottom of a 23 cm (9-inch) springform pan, using the back of a spoon or the bottom of a glass to create an even, compact layer. Place the pan in the refrigerator while you prepare the filling to help the crust set.
2. Beat the Cream Cheese
In a large mixing bowl, add the softened cream cheese. Beat with a hand mixer on medium speed for 2–3 minutes, until completely smooth and free of lumps. Scrape down the sides of the bowl as needed.
Add the powdered sugar, vanilla extract, and lemon juice. Continue mixing until fully combined and creamy.
3. Whip the Cream
In a separate bowl, whip the cold heavy cream using a clean whisk or mixer until stiff peaks form. The cream should hold its shape firmly when the whisk is lifted.
This step is key to achieving a light and airy cheesecake texture.
4. Combine the Filling
Gently fold the whipped cream into the cream cheese mixture using a spatula. Fold slowly and carefully to avoid deflating the cream. Continue until the mixture is smooth, fluffy, and evenly combined.
5. Assemble the Cheesecake
Remove the crust from the refrigerator. Spoon the cheesecake filling over the crust and spread it evenly, smoothing the top with a spatula.
Cover the pan loosely with plastic wrap and refrigerate for at least 6 hours, or preferably overnight, until the cheesecake is fully set.
6. Add the Cherry Topping
Once the cheesecake has set, spoon the cherry pie filling evenly over the top. Spread gently so the surface stays smooth and glossy.
Serving Suggestions
Slice the cheesecake using a sharp knife, wiping the blade clean between cuts for neat slices. This dessert is perfect for:
- Family gatherings and celebrations
- Potlucks and parties
- Summer desserts
- Make-ahead holiday treats
Serve chilled for the best flavor and texture.