This Classic Earthquake Cake is a vintage dessert favorite—rich, gooey, and delightfully messy in the best way. As it bakes, the layers “shift,” creating cracks and pockets of creamy sweetness throughout the chocolate cake. No two slices look the same, and that’s exactly the charm.
Ingredients
For the cake
- 1 box chocolate cake mix
- Ingredients listed on the cake mix box (usually eggs, oil, and water)
For the filling
- 8 oz (225 g) cream cheese, softened
- ½ cup unsalted butter, melted
- 2½ cups powdered sugar
- 1 tsp vanilla extract
For the topping
- 1 cup sweetened shredded coconut
- 1 cup chopped pecans
- 1 cup chocolate chips
Instructions
- Prepare the oven and pan
Preheat the oven to 350°F (175°C). Grease a 9×13-inch (23×33 cm) baking dish. - Layer the coconut and pecans
Sprinkle the shredded coconut evenly over the bottom of the prepared pan. Scatter the chopped pecans on top of the coconut, creating the base layer. - Add the cake batter
Prepare the chocolate cake batter according to package instructions. Pour the batter evenly over the coconut and pecans, spreading gently to cover. - Make the cream cheese mixture
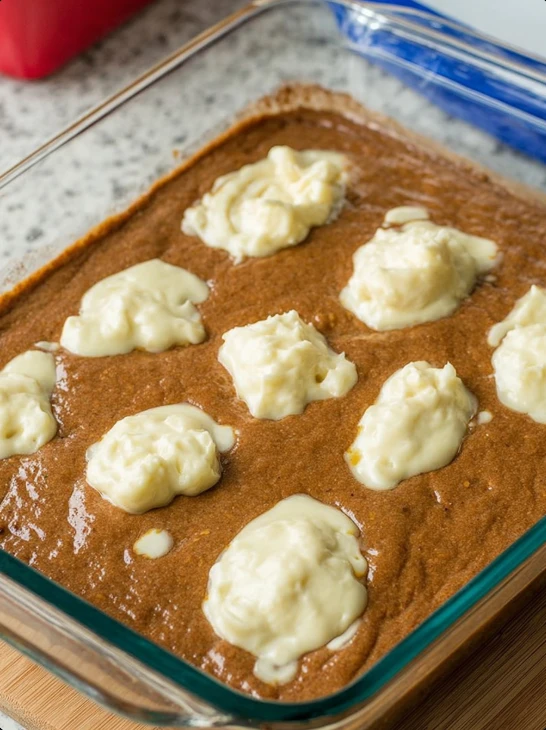
In a medium bowl, beat the softened cream cheese until smooth. Add the melted butter, powdered sugar, and vanilla extract. Mix until creamy and pourable. - Create the “earthquake” effect
Spoon the cream cheese mixture over the cake batter in several spots. Sprinkle the chocolate chips evenly over the top. As the cake bakes, the cream cheese mixture will sink and swirl, creating cracks and pockets. - Bake
Bake for 40–45 minutes, until the edges are set but the center is still slightly gooey. Do not overbake—this cake is meant to be moist and soft. - Cool and serve
Allow the cake to cool for at least 20 minutes before slicing. Serve warm or at room temperature.
✨ Tip: This cake tastes even better the next day as the flavors meld. Store covered at room temperature or refrigerate for a firmer texture.